mizztizzy2@gmail.com
MENU
How to Properly Store Seeds at Home
Appropriate containers for seed storage are glass or plastic containers, paper or plastic envelopes, Ziplock bags, and even clay vessels, although air-tight containers are recommended for long-term storage. Keep seeds cool, in a dry, and dark place that is protected from rodents, and other pests. Seeds are embryos encased in a womb-like shell, or, as has been said, “A seed is a plant in a box with its lunch.” Because seeds are alive, they’ll inevitably lose viability due to the conditions they are kept in. Leaving seeds in the sun, or any hot place, lying around the kitchen sink, or left outside exposed to the elements are all liable to negatively impact your seed’s viability. If you keep them in your freezer, please have them in several protective bags, and/or sealed cans, to prevent freezer burn. In the freezer, they will last for a very long time. But cool room temperatures are also acceptable, (some tropical plants may not survive the freezer temps). Research each seed you are trying to save to make sure you are not going to harm it.
By keeping seeds at a steadily controlled temperature, you reduce the chance of them going through shocks that will harm them; they’ll continue to remain viable. Still, while it's important to properly store your seeds, it's worth noting that seeds, in general, have evolved to be quite resilient. Some seeds prefer to self-seed (the parent plant is allowed to grow seeds and shed them in place, like cilantro, and bachelor buttons, but others can be harvested and live in storage longer than expected.
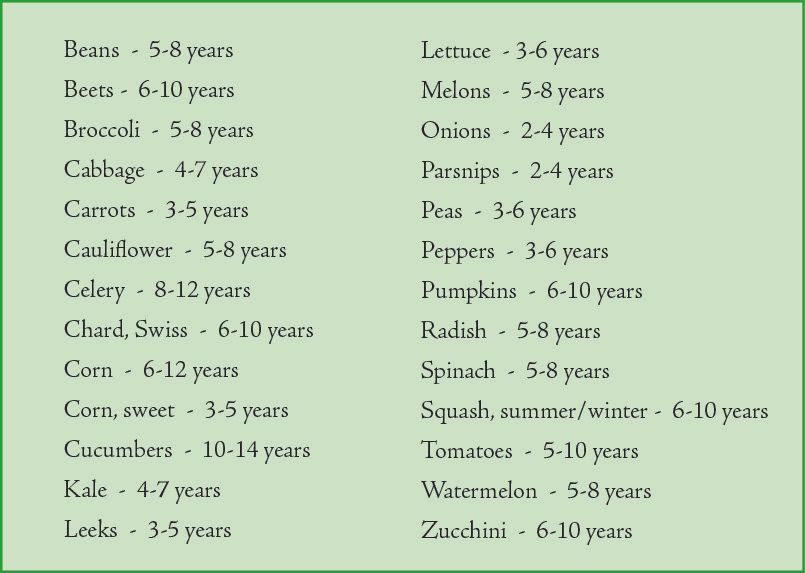
One of the best places for short-term (5 years) seed storage—a practice tried and true—is on a shelf in a cool, dry, and dark place, like a refrigerator or root cellar. Or, if you really want to hedge your bets, properly storing seeds in the freezer may keep them alive and waiting for years and years. Just remember to let the entire container of frozen seeds acclimate to warmer temperatures before opening the package. Also, always label your seeds properly! The botanical name, common name, date harvested, and any other important info.
How to Perform a Seed Viability Test
When in doubt, test your seeds. Moisten a sheet of wet paper towel or coffee filter. Fold 10 seeds into the towel or filter. Seal the paper seed-filled towel in a zipper bag and then be sure to mark the bag to identify the seeds. Place the bag in a location where the temperature is around 70 degrees. (Test exactly 10 seeds because it easily tells your the percentage rate of germination. If 8 seeds sprout, you will know you have about 80 percent viability for that particular plant variety.)
Wait 7-10 days (some herb seeds will take up to a month to germinate [American Ginseng can actually take up to 120 days). Be sure the paper towel or filter does not dry out during this time. If 70% or below have germinated, use them, but sow them more thickly. Performing seed viability tests makes seed saving less risky, and will also let you know when you need to replace certain seed varieties.
Drying your Seeds is an Important Step
An important principle in seed storage is that the more a storage container or location restricts the release of moisture, the drier your seeds will need to be so as not to cause mold. To be on the safe side, it is recommended to dry seeds to a level that is called “very dry” before storing in any container that restricts the release of moisture. Test small, oblong seeds, or thin ones (such as squash) by bending them. If they are “very dry,” they will snap instead of just bending. With bigger seeds such as corn, beans, or peas; put seeds on a hard surface and hit them with a hammer. If they are “very dry,” they will shatter when hit. If seeds are inadequately dry, they will be mushy instead of shattering. Also, if they are still moist they may mold and rot. Air drying the seeds for at least a week or more in a cool, dark environment is a great way to be sure of the needed dryness.